CSV's allow you to bulk import pre-made content into an account with an image and caption ready to go!
Creating Your CSV
The first step is to download our template which you can find here: CSV Template
Formatting Your CSV
At Least One of These Fields Must be Included:
Link
This is the URL for any online content you would like to share. Blogs, Podcasts, Online Products, etc. Our system will pull the metadata for links, meaning the image and caption already associated with that link. However, you can still input your own caption into the Caption column if you would like to override the existing one.
Image
This is the URL of an image you want to share. You can use sites such as Imgur or other free image hosting sites to upload your image. Once these images are loaded in, you will want to find the 'Direct Link' and paste it into the CSV Template. For more information on how to host your images, check out the video above.

Caption(s)
This is going to be the text which appears below your content. You can add multiple captions in the Caption field by separating your captions with this divider: %|%
These Are The Optional Fields:
Title, Approved, Recycle
You must provide at least a link, image, or caption to be shared for each post. The Title, Approved, and Recycle fields are optional. They will default to the defaults set in your account settings if not provided.
Comment
Add an internal comment for your team or the client by adding text to the optional Comment field. This can be viewed when you or a team member clicks on a content item.

Schedule
Schedule the content by using the Schedule field in this format yyyy-MM-dd HH:mm
For example, 2020-03-04 17:45 would equate to March 4th, 2020 at 5:45pm using the brand's default timezone.
Alternatively, you can just choose the desired day (for example: 2019-12-25) and we will automatically schedule the post the statistically best time for that day, the content, and selected accounts.
You can also add a category to the CSV upload for category-based scheduling.
Category
Categorize your new content by using the Category field in this format: Category 1, Category 2
Once you're done drafting up your content, export the spreadsheet as a CSV (comma-separated values) file.
Shorten Link
If you're sharing a link in the "Link" column, you can use the link shortener feature to automatically shorten that link into a "shaa.re" link.
This feature is especially useful when sharing links to LinkedIn, since LinkedIn will sometimes have trouble processing links in their natural state. Shortening links going to LinkedIn prevents any issues like that from happening.
To shorten your links, just provide either "TRUE" to shorten, or "FALSE" to not shorten in this column. 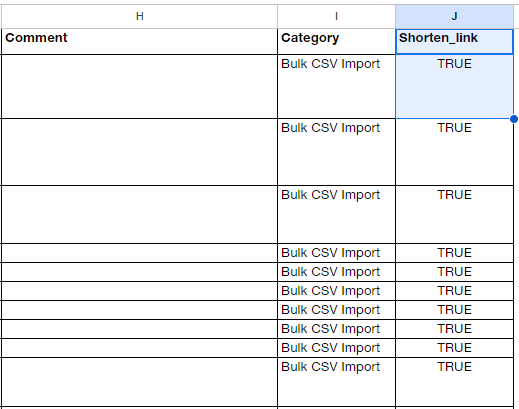
Importing Your CSV:
Brand View
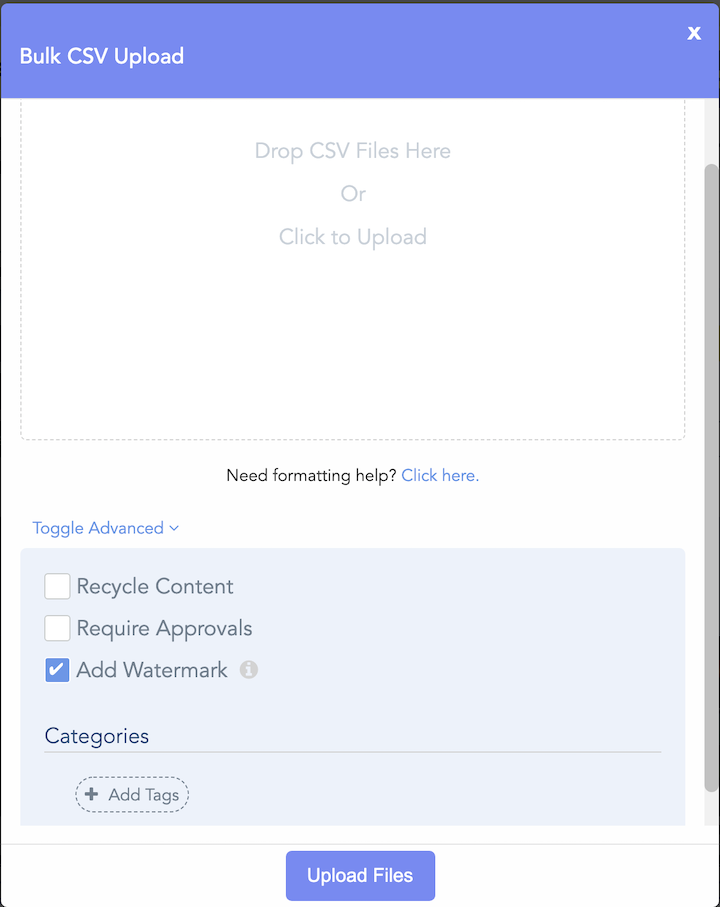
To import your content into the system, you will want to navigate over to your Content Library and select the gear icon in the center of your screen. From here you will click Upload CSV Content

From here you can either click to add or drag and drop your file into the system. You will also see the option to Toggle Advanced. This is where you can select your defaults as well as the category associated with the content you are loading in.
Master View
Importing a CSV into the master view will allow you to bulk import your content into multiple workspaces at the same time. To import your content into the master view, navigate to Master View by clicking the drop down in the top right corner of your screen

From here you will click on Bulk Operations and then Upload CSV Content.

Now you will just need to click or drag your file into the system and then select which brands you want the content to go to.